Showing posts with label featured. Show all posts
Thursday, 13 December 2012
MALM meets NUMERAR Kitchen Island
Materials: MALM, NUMERAR, AKURUM
Description: My wife and I recently bought our first house. Yay! As you can imagine, living in L.A. means housing is very expensive, and we didn't have very much left in our budget to renovate the new house as much as we would have liked to.
One of the things we knew we wanted to concentrate on was creating as nice a kitchen as our dollars would let us. So that meant the usual suspects: IKEA cabinets, cheaper countertops (we wanted Ceaserstone), and less cabinetry. We also kept the stove that came with the home as we did not have the Benjamins to splurge on a new one. We also kept our old refrigerator. The only appliance we bought new was the dishwasher, also from IKEA.
I'd like to show you how we took $559 and made ourselves a pretty cool island that we love.
1. First, we outlined the footprint of the island, 3'x6' with Blue painters tape. FYI, the kitchen is not finished in these photos.
2. The next step was to build a frame base. Here we used 2x4s that are held down with angle brackets. Do you see the dresser under the window? That is an IKEA MALM bedroom dresser that we will be using as part of our island.
3. Once the base was built, we attached the MALM dresser. To the left of the dresser (as seen in this view) is an IKEA base cabinet. We found it in AS IS at IKEA and it was in rough shape as you can see. We snatched it up for $10!!
4. With both bases in, we can now move on the next step: the sides and top.
5. For the sides and the top we decide to use IKEA wood countertops. We purchased two; each one is 3'x6' basically. We cut one right in half, and voila, the sides of the island!
6. The top is, you guessed, a full sheet of the IKEA wood countertop. This is so heavy, we barely had to fasten it in place much, we just used two brackets on either end, tucked away inside so you can't see them.
7. For the face of the island, we attached a piece of 1/2" plywood to the 2x4 base and the back of the cabinets. We then used a sheet of vinyl wall panel (called Plas-Tex) that we picked up at Lowe's. It is attached with Liquid Nails, that's it. So far, its held up well. Easy to clean kick marks too!
8. This is what the other side looks like. the MALM drawer gives it a very refined look we think. The only thing left to do is to add some shelving on the right and a toekick.
9. Yes we would have liked to have some doors here instead of exposing the pots and pans, but the budget wouldn't allow it. Nobody sees this side as much anyway so we're ok with it.
Well, there you have it, our $559 kitchen island. Hopefully, it will inspire you to do something you're happy with, and not spend too much money doing it. I did sand it and seal it when it was all put together of course.
Here is a list of the items we bought (with prices, rounded to the nearest dollar) with links, if available:
(3) 2x4s (10'), Lowe's, $8.40 + tax = $9
(2) Countertops, IKEA Numerar $390 + tax = $424.
(1) IKEA Malm dresser, $69.99 + tax = $76
(1) IKEA Base Cabinet, (AS IS), $9.99 + tax = $11
(2) Shelves and back of island, Lowe's, made from (1) 4'x8' sheet of 1/2" plywood, $15.97 + tax = $17
Plas-Tex Vinyl Sheet, Lowe's, $19.98 + tax = $22
Total: $559
See more of the customised kitchen island.
~ Danny Cerezo, Los Angeles, CA
Little octopuses lamp
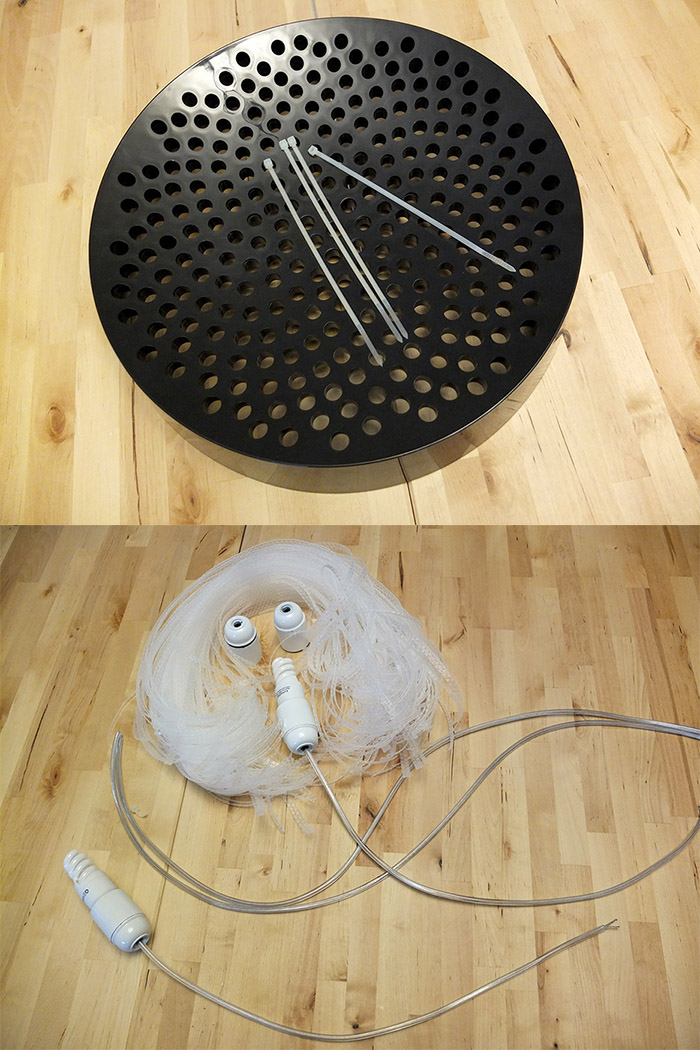
Materials: Ikea PS2012 bowl, Variera drawer mat clear, wire, cold light bulbs
Description: Cut the drawer mat in 8 cm wide strips, following the same direction as it is rolled (this way when cut, the strips will get curly)
Then, cut again every strip following the pattern between the dots, alternating strips with one and two dots. Leave the center of the large strip uncut, approx. 8 cm.
Use four large strips crossed to wrap the bulbs (non-incandescent, of course, for safety reasons). Attach the strips to the bulbholder (it has to be good quality in order to avoid overheating) with a plastic fastener.
Hang the wrapped bulbs at different heights with transparent wire through the holes of the PS2012 bowl.
Finally attach the bowl to the ceiling with a regular lamp clamp, and comb the curly strips to your taste.
Enjoy the marine effect :-)
~ J.Carlos Garc�a, Madrid - Spain
CAUTION: Possible fire hazard if used with incandescent light bulbs and unsuitable fixtures
Wednesday, 12 December 2012
Light Up Nose for Rudolph
Materials: STR�LA, Light Blub, Faux Taxidermy Deer Head
Description: What's a mounted Rudolph head without a light up nose? Just a lame old deer head, that's what! So if you have one of those cardboard taxidermy deer heads (or you can download a template to make your own here) and want to make it a bit more festive, I've got the perfect hack for you.
Here's what you'll need: a strand of battery operated red LED lights (STR�LA $3), a hollowed out light bulb that is sized appropriately for your deer head, some Krylon Looking Glass spray paint, electrical tape, and wire strippers.
Since I didn't want to be able to see the LED lights on the STR�LA strand, I sprayed the Looking Glass spray paint inside of the bulb and distressed it with a little water to get a faux mercury glass look.
Next you will need to remove any excess LED's from the STR�LA strand. Figure out how many led lights will fit through the opening of your light bulb. In my case 5 LED's could fit. I cut out the extra LED's from the middle, leaving as much excess wire as possible connected to my 5 LED's and the battery pack. Strip the last quarter inch of these wires and reconnect the battery pack wires to the led's. You will need to turn the battery pack on to make sure they are working, if not switch the wires.
Once the lights are working use some electrical tape to secure the wires separately. I also used the same electrical tape to bundle all the LED's together.
Then it's as easy as cutting a hole through a few layers of your Deer Head, fishing the wires through, and hiding the battery pack. In fact, if you use the template from Instructables (blown up 400%) the pack will tuck nicely in one of the cavities.
Now, invite some people over to your holiday party so they can admire your handy work.
If you'll like more details to create your own Mounted Rudolph Head come on over to my blog, The Ambitious Procrastinator.
~ Nikki Kelly, Denver, CO
Monday, 10 December 2012
Spruce It Up
Materials: MARGARETA + KVARTAL
Description: I created a curtain Christmas Tree using the MARGARETA fabric and KVARTAL top and bottom rail from Ikea in just 5 easy steps.
1. I measured to the center of the fabric using a tape measure and ironed on a 4 inch strip of Pellon 808 craft fuse Iron-on backing down the center. This enabled me to cut the fabric in half without the fabric fraying once it was cut.
2. Once the fabric was in two pieces I measured the length of the KVARTAL rail and cut each piece of fabric on the outside edge to be one inch longer than the rail.
3. Using my iron on the hottest setting I ironed the outside edge under by the extra inch. I secured the top and bottom KVARTAL rail to each half of the fabric
4. I took down the two center panels of my KVARTAL curtains and hung the two tree panels in its place.
5. I added the ornaments by affixing green craft wire to the ornaments and poking the wire through the fabric. Once the wire was through the fabric I just bent it down flat against the back of the curtain.
Now I have a no-mess, no-space-required, Christmas tree!
~ Camron
Appl�d storage bed
Materials: Appl�d faktum top cabinet for fridge and mdf
Description: Our daughter needed a new bed. To utilize the little space she has, we wanted a bed to go under her window. The problem was that her room is only 204 cm narrow. No bed available for that in full size. That's when it hit me, lets make an Ikea hack.
First we bought three Appl�d Faktum cabinets made for wall mounting above the fridge.
Size is 57 cm high, and 60 cm wide. Depth is also standard 60 cm. Total 180 cm wide. I made a frame to fill in the caps on both sides of the cabinets and fasten the mdf "bed bottom".
![]() |
| The skirting is cut to size. Also got help from the inspector to check that everything was up to ordered standard. |
![]() |
| Cabinets and frame mounted to the wall and around the cabinets. Also note the beam so I could use to sheets of mdf. |
The bed is 90 cm deep, but the cabinets are just 60 cm deep. So I made the bottom out of two sheets of mdf. One is 60 cm wide, and the one in the back is 30 cm wide. I also drilled two holes for easy lifting with two fingers. This makes the room behind the cabinets available. We us it to store an extra mattress.
~ Markus, T�rn�sen, Norway
Friday, 7 December 2012
Lack sofa table platform bed
Materials: LACK sofa table, 5 2x4's, plywood, screwgun
Description: Screw a 2x4 to the wall at the same height as top of Lack table. connect 4-5 2x4's to that board and Lack table with screws. Cut plywood to fit your size bed. Also can use coffee table, this bed sits very high.
~ cotton spangler, Studio City
Thursday, 6 December 2012
Tuneo de Torbj�rn de Ikea
Materials: Chair Tobj�rn of Ikea, wool needle, cotton thread # 5, inspiration
Description: I was inspired by embroidered red and I used the back of the chair mat as well and change its appearance. The drawing was invented on the fly changing in each row fretwork pattern.
See more of the embroidered chair.
~ Lo veo y me gusta, Espa�a
Subscribe to:
Posts (Atom)